
Following the blog post about how 5G and Multi-access Edge Computing (MEC) can help reduce latency on applications, the idea of this walkthrough is to guide developers in creating their own environment in Vodafone's edge network with the help of AWS Wavelength Zones. This is the first of a series of posts that will guide a developer into deploying a full architecture on the edge of Vodafone’s mobile network. Vodafone is a unique partner to AWS in that it is the first one to offer commercially available AWS Wavelength deployment across multiple edge zones and countries (London - Manchester in the UK and Berlin - Dortmund - Munich in Germany) and AWS Regions (eu-west-2 and eu-central-1).
To learn more about AWS Wavelength Zones and how it can help deliver lower latency on your applications, you can go to this link: AWS Wavelength FAQs.
It should take between 15 and 20 minutes to complete the steps listed in this article.
Table of Contents
Prerequisites
To complete this guide, you will need:
-
A device on Vodafone's network (a mobile or a computer connected to a Vodafone 5G hotspot, for example).
-
Attention: currently, AWS Wavelength Zones are only available in England and Germany.
-
The best way to experience the benefits of Vodafone's MEC in the UK is by using an IoT SIM card, but a regular Vodafone SIM card will work as well. Information on how to acquire an IoT SIM card can be found here.
-
-
An active AWS account.
-
AWS CLI installed and configured. Here is the official installation/update guide for AWS CLI.
-
AWS Wavelength Zones are not automatically available and need to be opted in. This guide describes how to do that.
Warning
-
Not all of the AWS resources utilised during this exercise qualify for AWS' Free-Tier, so be aware that there will be charges to your account. To reduce costs, it is strongly advised that any EC2 instances not being used are kept in a "STOPPED" state. Using two EC2 instances (a t3.medium at an AWS Wavelength Zone and a t2.micro at eu-west-2), one carrier IP, and one VPC would cost approximately 6.19 USD per month. This cost is based on certain assumptions and might vary depending on your own usage and needs. A summary of this estimate can be found here. You can learn about pricing assumptions here.
-
EC2 instances deployed on AWS Wavelength Zones have a few constraints. The main ones for this walkthrough are:
-
UDP traffic between the EC2 instance and the internet is not allowed and only outbound and the response is allowed for TCP. Between the EC2 instance and a device on the carrier network, all traffic is allowed.
-
Only the following instance types are supported:
-
t3.medium
-
t3.xlarge
-
r5.2xlarge
-
g4dn.2xlarge
-
-
EBS volumes must be gp2.
-
A full list of considerations can be found on this link.
Let's do this!
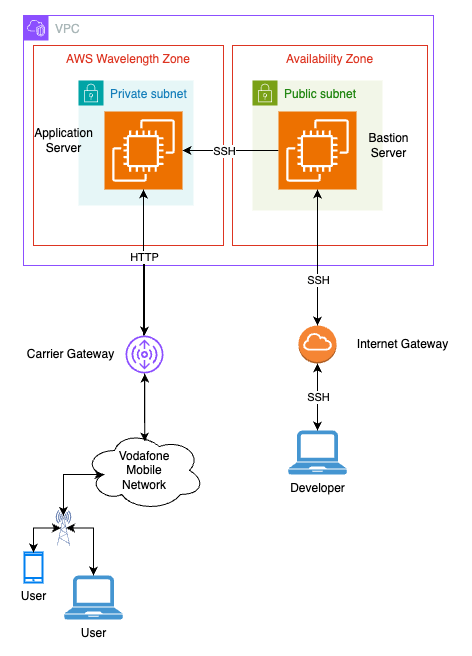
Now that all of that is out of the way let's talk architecture. As mentioned, the EC2 instance deployed on the AWS Wavelength Zone does not accept direct connections from the internet, so a bastion server needs to be put in place to allow communication with the instance. Alternatively, the AWS Systems Manager can be used to access an instance deployed on an AWS Wavelength Zone, however that requires configuring roles at AWS IAM. A full guide on how to set this up can be found here.
For this walkthrough, the bastion option will be used, and the final architecture will look like this:
But first things first: before any instances are deployed, some bits and pieces need to be in place:
Virtual Private Cloud (VPC)
First, a VPC and associated resources need to be created for the servers to be deployed. The following command will create one at AWS' eu-west-2 (London) region and output its ID:
export REGION=eu-west-2
export VPC_ID=$(aws ec2 create-vpc \
    --region $REGION \
    --cidr-block 10.0.0.0/16 \
    --output text \
    --query 'Vpc.VpcId') \
    && echo '\nVPC_ID='$VPC_ID
Next is to create an internet gateway and attach it to the VPC from the previous step:
export IGW_ID=$(aws ec2 create-internet-gateway \
    --region $REGION \
    --output text \
    --query 'InternetGateway.InternetGatewayId') \
    && echo '\nIGW_ID='$IGW_ID
aws ec2 attach-internet-gateway \
    --region $REGION \
    --vpc-id $VPC_ID \
    --internet-gateway-id $IGW_ID
And finally for this section, a carrier gateway needs to be created. As explained here, a carrier gateway serves two purposes:
-
It allows inbound traffic from a carrier network in a specific location and
-
it allows outbound traffic to the carrier network and the internet.
As previously mentioned, there is no inboud connections from the internet to an AWS Wavelength Zone through the carrier gateway.
The command below will create the needed carrier gateway:
export CAGW_ID=$(aws ec2 create-carrier-gateway \
    --region $REGION \
    --vpc-id $VPC_ID \
    --output text \
    --query 'CarrierGateway.CarrierGatewayId') \
    && echo '\nCAGW_ID='$CAGW_ID
Security groups
This section contains a step-by-step guide on how to create Security Groups, which are used to control inbound and outbound traffic for associated resources.
For this architecture, two Security Groups will be created: one for the bastion host and another for the application server.
The commands below create the first Security Group, for the bastion host, and then add a rule allowing ingress TCP traffic through port 22 (ssh protocol) for one specific IP address (your own). All outbound traffic is allowed.
export OWN_IP=$(curl https://checkip.amazonaws.com)
export BASTION_SG_ID=$(aws ec2 create-security-group \
    --region $REGION \
    --vpc-id $VPC_ID \
    --group-name bastion-sg \
    --description "Security group for the bastion server" \
    --output text \
    --query 'GroupId') \
    && echo '\nBASTION_SG_ID='$BASTION_SG_ID
aws ec2 authorize-security-group-ingress \
    --region $REGION \
    --group-id $BASTION_SG_ID \
    --protocol tcp \
    --port 22 \
    --cidr $OWN_IP/32
Now, the Security Group for the application server. It will contain two rules:
-
one allowing ingress TCP traffic through port 22 (SSH protocol) for one specific Security Group: the one to which the bastion host belongs to; and
-
one allowing ingress TCP traffic through port 8181 for all IPs. That port is for an application to listen to for incoming connections. If your application uses a different port, feel free to change it in the respective command.
All outbound traffic is allowed.
Here are the commands:
export APP_SG_ID=$(aws ec2 create-security-group \
    --region $REGION \
    --vpc-id $VPC_ID \
    --group-name aLB-sg \
    --description "Security group for application server" \
    --output text \
    --query 'GroupId') \
    && echo '\nAPP_SG_ID='$APP_SG_ID
aws ec2 authorize-security-group-ingress \
    --region $REGION \
    --group-id $APP_SG_ID \
    --protocol tcp \
    --port 22 \
    --source-group $BASTION_SG_ID
aws ec2 authorize-security-group-ingress \
    --region $REGION \
    --group-id $APP_SG_ID \
    --protocol tcp \
	--port 8181 \
	--cidr 0.0.0.0/0
Subnets and Routing Tables
For the next steps, the network will continue to be configured so that once the instances are deployed, they are accessible right away.
Firstly, let's create the subnet for the AWS Wavelength Zone in London, its route table, associate them and at the end create a route so that traffic is correctly routed to the carrier gateway.
export AZ=eu-west-2-wl1-lon-wlz-1
export WL_SUBNET_ID=$(aws ec2 create-subnet \
    --region $REGION \
    --cidr-block 10.0.0.0/26 \
    --availability-zone $AZ \
    --vpc-id $VPC_ID \
    --output text \
    --query 'Subnet.SubnetId') \
    && echo '\nWL_SUBNET_ID='$WL_SUBNET_ID

WL_RT_ID=$(aws ec2 create-route-table \
    --region $REGION \
    --vpc-id $VPC_ID  \
    --query 'RouteTable.RouteTableId' \
    --output text) \
    && echo '\nWL_RT_ID='$WL_RT_ID
aws ec2 create-route \
    --region $REGION \
    --route-table-id $WL_RT_ID \
    --destination-cidr-block 0.0.0.0/0 \
    --carrier-gateway-id $CAGW_ID

aws ec2 associate-route-table \
    --region $REGION \
    --route-table-id $WL_RT_ID \
    --subnet-id $WL_SUBNET_ID
With that completed, now it is time to create a subnet, a route table, and a route for the bastion host:
export BST_SUBNET_ID=$(aws ec2 create-subnet \
    --region $REGION \
    --cidr-block 10.0.1.0/25 \
    --vpc-id $VPC_ID \
    --output text \
    --query 'Subnet.SubnetId') \
    && echo '\nBST_SUBNET_ID='$BST_SUBNET_ID

BST_RT=$(aws ec2 create-route-table \
    --region $REGION \
    --vpc-id $VPC_ID  \
    --query 'RouteTable.RouteTableId' \
    --output text) \
    && echo '\nBST_RT='$BST_RT
aws ec2 create-route \
    --region $REGION \
    --route-table-id $BST_RT \
    --destination-cidr-block 0.0.0.0/0 \
    --gateway-id $IGW_ID
aws ec2 associate-route-table \
    --region $REGION \
    --route-table-id $BST_RT \
    --subnet-id $BST_SUBNET_ID
Elastic IP and Network Interface
To finalise the environment for the instances, an IP associated with Vodafone's network and an associated Elastic Network Interface (ENI) are necessary for the application server. The bastion host will have a public IP address, so it does not require these elements
Here are the commands for the Elastic IP:
export APP_CIP_ALLOC_ID=$(aws ec2 allocate-address \
    --region $REGION \
    --domain vpc \
    --network-border-group $AZ \
    --output text \
    --query 'AllocationId') \
    && echo '\nAPP_CIP_ALLOC_ID='$APP_CIP_ALLOC_ID
And for the ENI:
export APP_ENI_ID=$(aws ec2 create-network-interface \
    --region $REGION \
    --subnet-id $WL_SUBNET_ID \
    --groups $APP_SG_ID \
    --output text \
    --query 'NetworkInterface.NetworkInterfaceId') \
    && echo '\nAPP_ENI_ID='$APP_ENI_ID
And finally, to associate the IP with the ENI:
export ASSOC_ID=$(aws ec2 associate-address \
    --region $REGION \
    --allocation-id $APP_CIP_ALLOC_ID \
    --network-interface-id $APP_ENI_ID \
    --output text \
    --query 'AssociationId') \
    && echo '\nASSOC_ID='$ASSOC_ID
Instances
With the foundations in place, it is now time to deploy the instance.
A key pair is needed to connect to the hosts. If one is not available, a new one can be created with this command:
export KEY_NAME=VFWLTutorial
aws ec2 create-key-pair \
    --region $REGION \
    --key-name $KEY_NAME \
    --key-type "rsa" \
    --key-format "pem" \
    --output text \
    --query 'KeyMaterial' \
    >> ./$KEY_NAME.pem

# need to change the permissions on the .pem file for it to work properly:
chmod 400 ./KEY_NAME.pem
The above will download the key into the current directory, save it with the name of the variable stored in $KEY_NAME, and change its permissions.
Here are some details about the choices made for the instances about to be deployed:
-
Bastion host:
-
Instance type: t2.micro. Cheapest ("Free-Tier" eligible) instance available as it will only be used as a bridge to the application server. More information on the instance can be found here. More information on AWS Free-Tier is here.
-
Key name: name of the key created to connect to the instance. Check here for more details.
-
-
App server:
-
InsInstance type: t3.medium. Cheapest (not eligible for “Free-Tier”) instance available for deployment on an AWS Wavelength zone. More information on the instance can be found here.
-
Volume type: gp2. Only type of volume allowed on an AWS Wavelength Zone.
-
Key name: name of the key created to connect to the instance. Check here for more details.
-
Here are the commands for the bastion host:
export AMI_ID_LINUX=$(aws ssm get-parameter \
    --region $REGION \
    --name /aws/service/ami-amazon-linux-latest/al2023-ami-kernel-default-x86_64 \
    --query "Parameter.Value" \
    --output text) \
    && echo '\nAMI_ID_LINUX='$AMI_ID_LINUX

export BASTION_ID=$(aws ec2 run-instances \
    --region $REGION \
    --instance-type t2.micro \
    --image-id $AMI_ID_LINUX  \
    --key-name $KEY_NAME \
    --subnet-id $BST_SUBNET_ID \
    --associate-public-ip-address \
    --security-group-ids $BASTION_SG_ID \
    --output text \
    --query 'Instances[0].InstanceId') \
    && echo '\nBASTION_ID='$BASTION_ID
export BASTION_PUB_IP=$(aws ec2 describe-instances \
    --region $REGION \
    --instance-ids $BASTION_PUB_IP \
    --output text \
    --query 'Reservations[*].Instances[*].NetworkInterfaces[*].Association.PublicIp') \
    && echo '\nBASTION_PUB_IP='$BASTION_PUB_IP
This last command stores the external IP address of the bastion server so it can be easily accessed via SSH.
Now, for the application server:
export APP_INST_ID=$(aws ec2 run-instances \
    --region $REGION \
    --instance-type t3.medium \
    --network-interface '[{"DeviceIndex":0,"NetworkInterfaceId":"'$APP_ENI_ID'"}]' \
    --image-id $AMI_ID_LINUX  \
    --key-name $KEY_NAME \
    --block-device-mappings '[{"DeviceName":"/dev/xvda","Ebs":{"Encrypted":false,"DeleteOnTermination":true,"VolumeSize":8,"VolumeType":"gp2"}}]' \
    --output text \
    --query 'Instances[0].InstanceId') \
    && echo '\nAPP_INST_ID='$APP_INST_ID

export APP_PRIV_IP=$(aws ec2 describe-instances \
    --region $REGION \
    --instance-ids $APP_INST_ID \
    --output text \
    --query 'Reservations[*].Instances[*].NetworkInterfaces[*].PrivateIpAddress') \
    && echo '\nAPP_PRIV_IP='$APP_PRIV_IP
As mentioned on the beginning of this guide, any instance deployed on an AWS Wavelength Zone cannot be reached via SSH through the open internet, therefore the internal IP address of the application server is needed so the connection can happen via the bastion server, as they are both in the same VPC.
As a security measure, we will be using the -A flag of the SSH command, which enables forwarding the connections from an authentication agent. That way, there is no need to transfer the key to the bastion server. For that, the ssh-agent needs to be running and the private key added to the authentication agent. These can be achieved by the following commands:
eval "$(ssh-agent)" && ssh-add ./$KEY_NAME.pemFinally, using the bastion host as a hop, here is how to connect to the application server. Make sure to make a note of the application server's private IP:
echo $APP_PRIV_IPThe -A flag enables forwarding of connections from an authentication agent. A security prompt about the host not being in the list of known hosts might show up before the connection is completed.
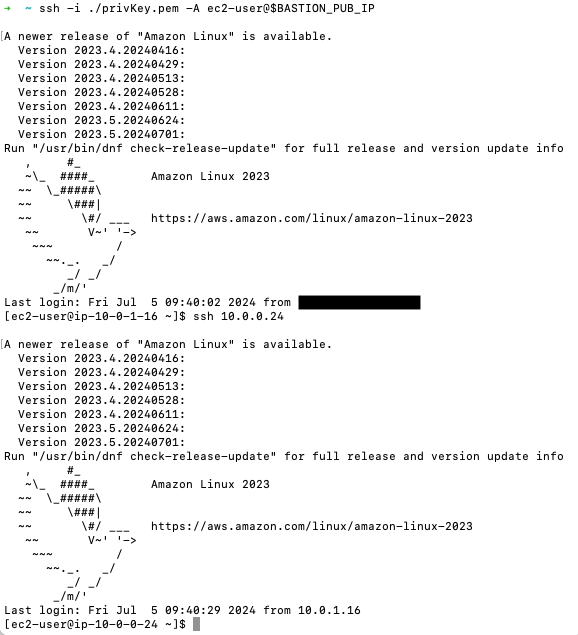
ssh -i ./KEY_NAME.pem -A ec2-user@$BASTION_PUB_IPNext, SSH into the application server using its internal IP address (APP_PRIV_IP: 10.0.0.24 in this example, could be different in your implementation)
ssh 10.0.0.24If your terminal screen looks like the image below, it means you did it. Congratulations!
Summary
In this walkthrough you have been shown how to create and implement all the elements needed to deploy a host at one of AWS Wavelengths Zones. In short, the following were created:
-
A Virtual Private Cloud,
-
Security Groups for the bastion host and the application server,
-
The necessary Subnets and Route Tables,
-
The Elastic IP and the Network Interfaces, and
-
The bastion host and application server.
In the next guide, a walkthrough on how to deploy an application on a host at an AWS Wavelength Zone is presented.
To stay up to date with the latest on Vodafone’s APIs and the Developer Marketplace, make sure to register your interest in our form. You can also use the form to reach out to us if you are having any issues with the steps listed here.
See you then!
Clean Up (Optional)
Here I will share the commands needed to remove all the instances and products created above. Note that these commands must be executed in the same terminal session as the ones done throughout this guide, as the environment variables are session specific.
First the instances need to be terminated:
watch -n 10 aws ec2 terminate-instances \
    --region $REGION \
    --instance-ids $BASTION_ID $INST_PRIV_IP \
    --output json \
    --query 'TerminatingInstances[*].CurrentState.Name'
The command above will refresh every 10 seconds. Wait until the output is as below before moving to the next ones:
{
	"terminated",
	"terminated"
}
Once that happens, execute the following commands:
aws ec2 delete-key-pair --key-name $KEY_NAME
rm -fv ./$KEY_NAME.pem
aws ec2 delete-network-interface \
    --region $REGION \
    --network-interface-id $APP_ENI_ID
aws ec2 delete-subnet \
    --region $REGION \
    --subnet-id $BST_SUBNET_ID
aws ec2 delete-subnet \
    --region $REGION \
    --subnet-id $WL_SUBNET_ID
aws ec2 delete-route-table \
    --region $REGION \
    --route-table-id $BST_RT
aws ec2 delete-route-table \
    --region $REGION \
    --route-table-id $WL_RT_ID
aws ec2 delete-security-group \
    --region $REGION \
    --group-id $APP_SG_ID
aws ec2 delete-security-group \
    --region $REGION \
    --group-id $BASTION_SG_ID
aws ec2 delete-carrier-gateway \
    --region $REGION \
    --carrier-gateway-id $CAGW_ID
aws ec2 detach-internet-gateway \
    --region $REGION \
    --internet-gateway-id $IGW_ID \
    --vpc-id $VPC_ID
aws ec2 delete-internet-gateway \
    --region $REGION \
    --internet-gateway-id $IGW_ID
aws ec2 delete-vpc \
    --region $REGION \
    --vpc-id $VPC_ID