 Introduction
As the next entry on the Multi-access Edge Computing (MEC) series (see previous blog post on how to create and access an AWS EC2 instance on AWS Wavelength), this will now focus on how to create and deploy an AI based YouTube video summariser to an instance and then how users can access it. Just as a reminder, Vodafone is a unique partner to AWS in that it is the first one to offer commercially available AWS Wavelength deployment across multiple edge zones and countries (London - Manchester in the UK and Berlin - Dortmund - Munich in Germany) and AWS Regions (eu-west-2 and eu-central-1).
The steps below will guide the developer through the creation of a Python webapp where the user is prompted to enter the link for a YouTube video and the application will produce a synopsis for it. Therefore, it is expected from the reader some profficiency in the Python programming language.
And at the end of this tutorial, I will let you know how Vodafone is making it easier for developers to utilise different AWS Wavelength Zones (WLZ) to ensure that the end users always have the best possible experience!
It should take around 20 minutes to complete all the steps in this guide.
Table of Contents
Prerequisites
To complete this guide, you will need:
-
A device on Vodafone's network (a mobile or a computer connected to a Vodafone 5G hotspot, for example).
-
Attention: currently, WLZs are only available in England and Germany.
-
The best way to experience the benefits of Vodafone's MEC in the UK is by using an IoT SIM card, but a regular Vodafone SIM card will work as well. Information on how to acquire an IoT SIM card can be found here.
-
-
An active AWS account.
-
AWS CLI installed and configured. Here is the official installation/update guide for AWS CLI.
-
WLZ are not automatically available and need to be opted in. This guide describes how to do that.
-
Python 3.11.
-
pip 22.3, the recommended package management system for Python that allows developers to install and manage software packages written in Python.
-
Since the app will rely on the usage of AI, NVIDIA drivers and software are needed to make use of the EC2 instance's GPU. The guide at this link contains the necessary steps.
Warning
-
Not all of the AWS resources utilised during this exercise qualify for AWS' Free-Tier, so be aware that there will be charges to your account. To reduce costs, it is strongly advised that any EC2 instances not being used are kept in a "STOPPED" state. Using two EC2 instances (a g4dn.2xlarge at a WLZ and a t2.micro at eu-west-2), one carrier IP and one VPC for an hour a day would generate an approximate cost of 39.48 USD per month. The choice to use a g4dn.2xlarge instance instead of the t3.medium used in the previous guide is because the large one is the only one with GPUs, which will be used for the AI based app. This estimation is based on certain assumptions and might vary depending on your own usage and needs. A summary of this estimate can be found here. You can lear about pricing assumptions here.
-
EC2 instances deployed on WLZ have a few constraints. The main ones for this walkthrough are:
-
UDP traffic between the EC2 instance and the internet is not allowed and only outbound and the response is allowed for TCP. Between the EC2 instance and a device on the carrier network, all traffic is allowed.
-
Only the following instance types are supported:
-
t3.medium
-
t3.xlarge
-
r5.2xlarge
-
g4dn.2xlarge
-
-
EBS volumes must be gp2.
-
A full list of considerations can be found on this link.
Setting Up
This walkthrough starts from the end of the last guide, meaning that the final architecture will remain unchanged:
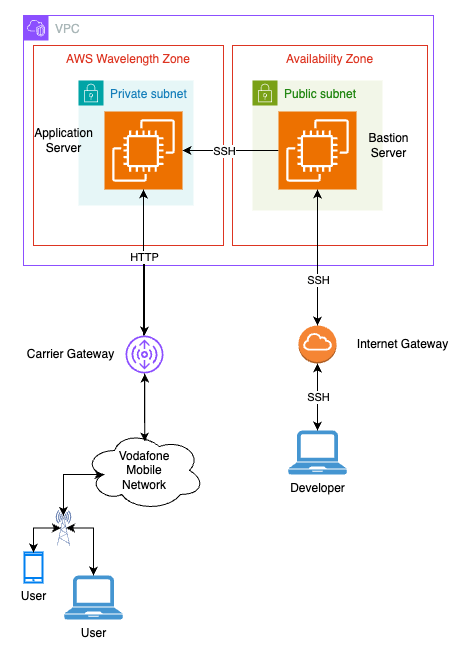
Figure 1: final architecture
There are only two basic changes that need to be done from the original steps:
-
Because the aim of this tutorial is to deploy an AI based application, the larger g4dn.2xlarge instance type will be used, as it is the only one with a GPU that can be deployed to an AWS Wavelength Zone.
-
The instance will need a larger storage capacity (100GB versus the original 8GB) to account for the software that needs to be installed.
Basically, the command to launch the instance of the application server needs to be changed to this:
export REGION=eu-west-2
export AMI_ID_LINUX=$(aws ssm get-parameter \
    --region $REGION \
    --name /aws/service/ami-amazon-linux-latest/al2023-ami-kernel-default-x86_64 \
    --query "Parameter.Value" \
    --output text)
export KEY_NAME=VFWLTutorial
export APP_INST_ID=$(aws ec2 run-instances \
    --region $REGION \
    --instance-type g4dn.2xlarge \
    --network-interface '[{"DeviceIndex":0,"NetworkInterfaceId":"'$APP_ENI_ID'"}]' \
    --image-id $AMI_ID_LINUX \
    --key-name $KEY_NAME \
    --block-device-mappings '[{"DeviceName":"/dev/xvda","Ebs":{"Encrypted":false,"DeleteOnTermination":true,"VolumeSize":100,"VolumeType":"gp2"}}]' \
    --output text \
    --query 'Instances[0].InstanceId')
That took care of the AWS side of things. Now, to configure the instance, SSH into it as described in the previous blog post and install Python 3.11, pip22.3, and the necessary libraries:
sudo dnf install python3.11 python3.11-pip -y
pip3.11 install pytubefix youtube_transcript_api transformers flask torch whisper
The application
With the environment set up, write the application that will be deployed to the server located at one of Vodafone's AWS Wavelength Zones. AWS has a service capable of building, training and deploying machine learn models called Amazon SageMaker, however it is not natively supported in WLZs. There are workarounds, such as the one mentioned in this linked article, but for the purposes of this guide, they will not be used, as the focus is to have a genAI application running on the Edge of Vodafone's 5G network.
The application described on the second paragraph of this guide takes a YouTube URL as input, gets the video's transcript and feed it through a text-to-text generation AI model to get a summary.
There are two options here:
- Create the files locally and transfer them to the server, or
- Login to the server and create the files there.
Either way, first, you need to create a .py file, load the necessary libraries, and add a function that will retrieve the transcript directly from YouTube:
from pytubefix import YouTube
from youtube_transcript_api import YouTubeTranscriptApi
from transformers import pipeline
from flask import Flask, render_template, request
import torch
import whisper
# given an URL, retrieve the transcript directly from YouTube
def get_yt_transcript(url):
    # place holder for the transcription
    text = ''
    # extract the video ID from the video in the URL
    vid_id = pytube.extract.video_id(url)
    # retrieve the transcript directly from YouTube and return it once finished
    temp = YouTubeTranscriptApi.get_transcript(vid_id)
    for t in temp:
        text += t['text'] + ''
    return text
Sometimes, YouTube videos do not contain a transcription. The function below extracts the video's audio and feed it through an open source automatic speech recognition (ASR) neural net named whisper, running locally, to transcribe it. Add this function to that same file.
# given an URL, transcribe a YouTube video
def transcribe_yt_vid(url):
    # download YouTube video's audio
    save_dir = "./docs/youtube"
    yt = YouTube(str(url))
    try:
        audio = yt.streams.filter(only_audio = True).first()
    except:
        return ''
    out_file = audio.download(filename = "audio.wav",
                              output_path = save_dir)
    # loading the model
    # here device="cuda" informs the server to use the GPU
    mode = whisper.load_model("base", device="cuda")
    # performing the transcription via the AI
    result = model.transcribe(out_file)

    text = result['text']
    # return the video's transcript
    return text
Putting the two functions together:
def transcribe_youtube_video(url):
    # creates a YouTube object
    yt = YouTube(str(url))
    # place holder for transcription
    text = ''
    # get the transcript from YouTube if available
    try:
        text = get_yt_transcript(url)
    # if it fails...
    except:
        print('Transcription not available, transcribing now ...')
        pass
    # transcribes the video if YouTube did not provide a transcription
    if text == '':
        text = transcribe_yt_vid(url)
    # returns the video title and the transcription
    return yt.title, text
Once the transcription is available, it will serve as input, together with the title and the maximum number of words for the summary.
Fort his part, the code will utilise Gemma Model, a lightweight text-generation open model from Google. This model will be running locally, using the instance's GPU and will receive as input a prompt containing the transcript and title of the video.
Here is the code for the function:
# given a video title, transcription and the minimum number of words, returns a summary for the video
def summarize_text(title, text, words):
    # this is the prompt
    # feel free to edit
    prompt = """
    You are an intelligent AI assistant that is tasked to review the content of a video and provide a concise and accurate summary.\n
    You do not provide information that is not mentioned in the video. You only provide information that you are absolutely sure about.\n
    The following is the title and a transcript of a video:\n
    ----------------------- \n
    TITLE:
    """ + title + """
    \n
    TRANSCRIPT:\n
    """ + text + """
    \n
    ----------------------- \n
    Take these and distil them into a consolidated summary.\n
    SUMMARY:\n
    """

    # here, "device=0" informs the host to use the GPU
    summarizer = pipeline("text-generation", model="google/gemma-2b", device=0)
    summary = summarizer(prompt, do_sample=False, max_new_tokens=words, batch_size=1)

    # returns the summary
    return summary[0]["generated_text"]
Now those functions need to go into a web application, which is comprised of two parts: the Python code and a couple of HTML pages. The Flask framework will be used, as it is lightweight and flexible.
First, two simple HTML pages need to be created: in the same directory where the .py file is located, create a sub directory named "templates" and create two files in it: data.html and form.html. Here are their contents:
- data.html
{% for key,value in form_data.items() %}
<h2>{{key}}</h2>
<p>{{value}}</p>
{% endfor %}- form.html
<!-- once the user press the "Summarise" button, the contents of the "Url" and "words" fields will be POSTED to the "data" route -->
<form action="/data" method="POST">
    <p>YouTube URL<input type="text" name="Url" /></p>
    <p>maximum number of words <input type="number" name="words" placeholder="200" /></p>
    <p><input type="submit" value="Summarise" /></p>
</form>
Back to the .py file, add the following between the imports and the functions previously created:
# initialise the Flask app
app = Flask(__name__)
# this is the landing page. It will render the “form.html” page defined earlier
@app.route('/')
def form():
    return render_template('form.html')
# when the user click on "Summarise", the information will be passed to the "data" route below:
@app.route('/data', methods = ['POST', 'GET'])
def data():
    # test if the user typed in "/data" directly into the address bar, instead of submitting the form
    if request.method == 'GET':
        return f"The URL /data is accessed directly. Try going to '/form' to submit form."
    if request.method == 'POST':
        # retrieve the URL and the maximum number of words for the summary
        url = request.form['Url']
        words = request.form['words']
        # in case no value was entered, set it to 200
        if words == '':
            words = 200
        # retrieve the title and the transcription of the YouTube video
        title, text = transcribe_youtube_video(url)
        # input the title, transcription and number of words into the function and retrieve the summary
        out = summarize_text(title, text, words)
        # render the 'data.html' file passing the summary to it
        return render_template('data.html', form_data = dict(Summary = out))
# the following functions have already been defined earlier on
def transcribe_youtube_video...
def get_yt_transcript...
def transcribe_yt_vid...
def summarize_text...
# the below will make sure that the app is externally accessible on the carrier IP address and at port 8181
app.run(host='0.0.0.0', port=8181)
The port mentioned above (8181) is the same one that was configured in the security group for the application server in the previous blog post. If you wish to use a different port, make suer that it is configured in the security group as well.
Now, to run the app, execute the following command on the application server's terminal:
python3.11 ./<nameOfPyFile>.pyThe following output should show up:
 * Serving Flask app 'yourAppName'
 * Debug mode: off
WARNING: This is a development server. Do not use it in a production deployment. Use a production WSGI server instead.
 * Running on all addresses (0.0.0.0)
 * Running on http://127.0.0.1:8181
 * Running on http://<internalIPAddress>:8181
Press CTRL+C to quit
Ensuring the device is connected to Vodafone's mobile network, open a browser and type in http://<carrierIpAddressFromEC2Instance>:8181. The IP address for the URL can be retrieved by running the following below. Remember that this must be executed in the same session in which the instance was first deployed:
export APP_INST_CIP=$(aws ec2 describe-instances \
    --instance-ids $APP_INST_ID \
    --query 'Reservations[*].Instances[*].NetworkInterfaces[*].Association.CarrierIp' \
    --output text) \
    && echo '\nAPP_INST_CIP='$APP_INST_CIP
Make sure it is HTTP as HTTPS has not been configured!! The following content should be displayed:

Figure 2: input form for the YouTube Summarise
Paste the URL of a YouTube video. Given the limitations of the large language model (LLM), the recommendation is to use videos around the 5-minute mark with dialog or narration in them, as the app needs text content to work. Larger videos will generate longer transcripts, which can be problematic when going through the LLM. Movie trailers tend to hit that sweet spot.
Following the click on the "Submit" button, a new page should load after a while containing a synopsis of the video.
Summary
This tutorial showed how to deploy a genAI based Python web application to one of Vodafone's AWS Wavelength Zone.
In the next post in this series, the architecture that is currently being worked on will be extended by adding an application load balancer to the WLZ.
To stay up to date with the latest on Vodafone’s APIs and the Developer Marketplace, make sure to register your interest in our form. You can also use the form to reach out to us if you are having any issues with the steps listed here.
Keep watching this space!
Clean Up (optional)
As usual, here are the commands to delete the resources created during the course of this guide:
# wait until the output changes to "terminate" before cancelling the command moving forward
watch -n 10 aws ec2 terminate-instances \
    --region $REGION \
    --instance-ids $ APP_INST_ID \
    --output json \
    --query 'TerminatingInstances[*].CurrentState.Name'
aws ec2 delete-network-interface \
    --region $REGION \
    --network-interface-id $APP_ENI_ID
Remember that you need to manually release the carrier IP addresses from the URL https://console.aws.amazon.com/ec2. Make sure you are in the correct region!
